How I Created the JFK Assassination in 4K 360° VR
Here’s how I brought viewers back in time to the JFK assassination using a 360 camera and modern compositing software.
As a person in the creative world I have ideas all the time, and most of these ideas never come into existence... However, when I had the idea to bring viewers back in time to the JFK assassination I knew I had to see this project through to completion. Here's the video if you haven't seen it.
As a history buff, I was excited to finally bring my love of education, history, and VFX together with a fun and informative time-travel project. So how exactly did I pull this off? Let me show you step-by-step.
How I Created the JFK Assassination in 360 VR
First things first...
Step 1: Figure Out Where Zapruder Shot the Film
The first step on our journey was to figure out the exact place in which Zapruder shot the film. If we were off by just a few feet the illusion would almost be impossible to create in post-production.
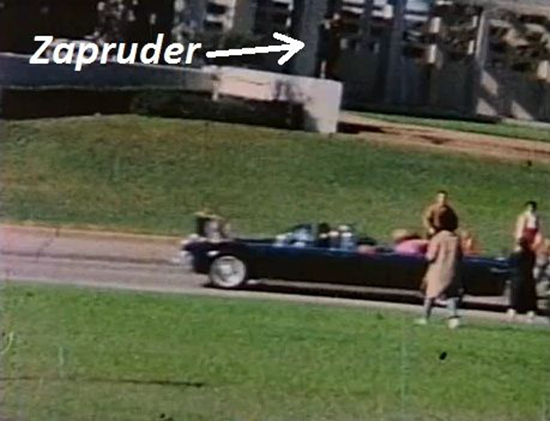
Luckily there are plenty of resources out there for figuring out the exact spot where he stood. Plus, there were plenty of history buffs hanging around Dealey Plaza who were happy to point us to the podium.
Step 2: Stand in the Exact Spot and Shoot a Plate
Once we found the right spot we had to set up our camera at the exact height in which Zapruder shot the film. We used stills from the Zapruder Film to double check our placement which posed a challenge.
After we were sure about the camera placement we used a Theta S to shoot a few images. We also decided to walk around Dealey Plaza and get some extra pictures. I’m super glad we did this because we ended up using them in the film.
Step 3: Create a Flat Plate of the Entire Zapruder Film Background
After the shoot I needed to figure out a way to place the Zapruder film into the 360 plate. The best way to do this would be to create a seamless background of the original Zapruder film. This was done using stills from the Zapruder film in Photoshop.

It was a tedious process, to say the least.
Step 4: Mix the 360 Plate with the Zapruder Background Film
After the still 1963 background was created it was time to match it up with the modern-day 360 plate. To do this I used After Effects, a compositing software that makes 2D projects like this very easy.

The Zapruder film background and the 360 plate combined.
I used a method called nesting to place the background composition into the 360 plate. There are lots of bending tools in After Effects to make this process easier. I used the bezier warp effect to get the plate exactly right. This was a very challenging step.
Step 5: Cleanup the Plate
Once the background and the 360 plate was merged it was time to tidy up the frame. I did a lot of basic cleanup to make the documentary easier to follow and look more natural. A lot of cleanup time was spent blending edges and removing modern day people from the 360 plate.

Smooth out the edges.
Step 6: Add in the Video Frame by Frame
This step was by far the most tedious. We took the Zapruder film and frame by frame matched it to the new 360 plate. This was all done in After Effects. 486 times. I have a lot of respect for rotoscope artists after completing this step.

The After Effects Composition
Step 7: Cleanup the Video

Time to put it all together.
After the Zapruder film was added in it was time to do some basic cleanup. I added in part of the car and cleaned up the color in a few areas.
Step 8: Add in Graphics, VO, & Music
With the hard part completed, it was time to create a story.
We had an idea to add in graphics to the video to help give the audience some historical context. We used After Effects to create graphics for the video and composited the scene using Mettle, a 360 plugin that was actually acquired by Adobe last year.
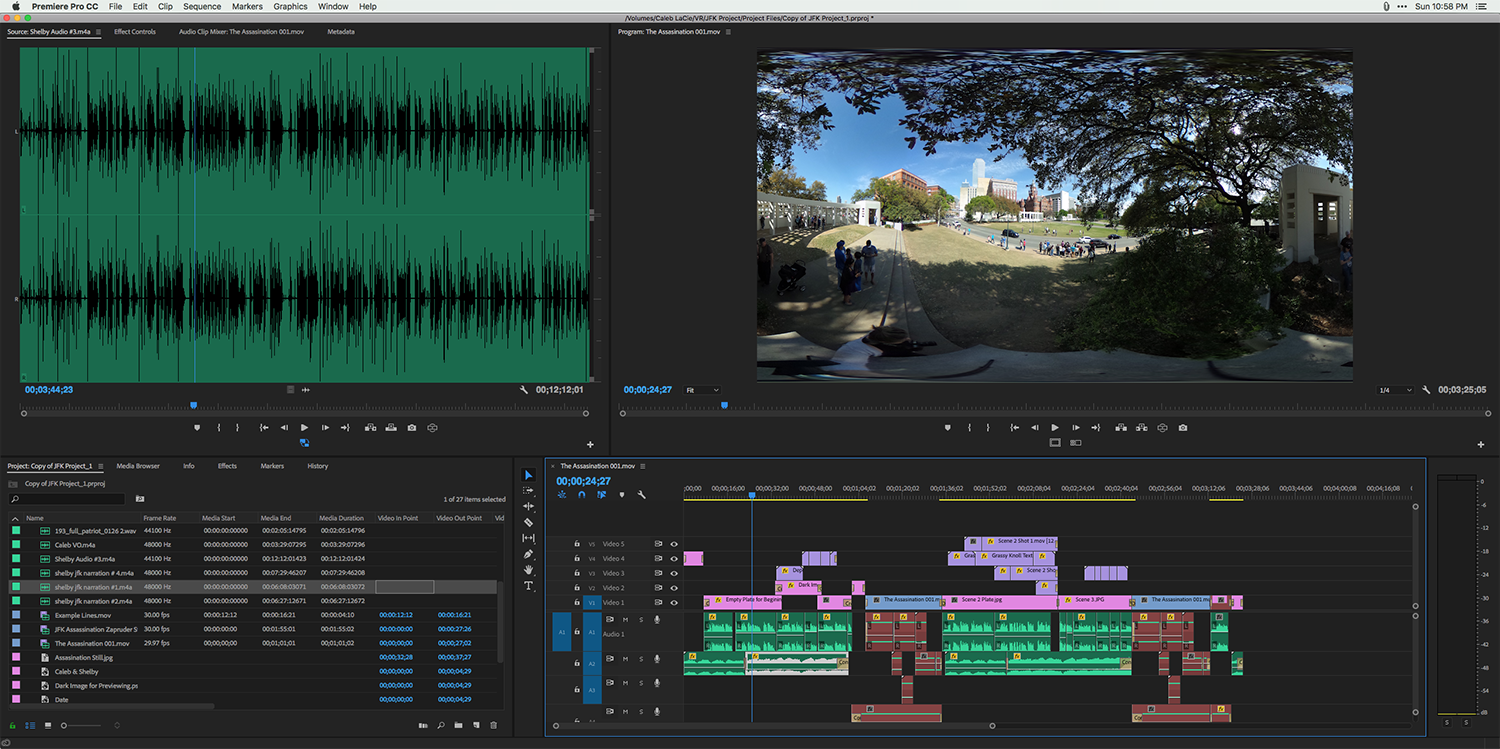
The Timeline!
We created a script, Shelby recorded the VO, and the entire project was compiled in Premiere Pro.
The Reception
The reception to this video from the online community has been insane, to say the least. I am consistently shocked by the response that this project brings to people around the world. The growth on the video was pretty slow until one day YouTube decided to put the vid on the YouTube homepage. The rest was history (no pun intended). At the time of this article's publication, the video has over 6 million views.

The growth on this video was insane...
As with any controversial subject, this documentary has been met with praise and criticism. People have been so kind to offer encouragement and friendly critique.

There are some super kind people out there!
Thank you so much to everyone who has supported us in this project. Every time I see a comment about someone watching a 360 video for the first time it makes me super happy. Now let’s have some fun...
JFK Assassination in 360 Video FAQs (My Favorite Part)
Why is the background messed up halfway through the video?
Unfortunately, when we shot the film we didn’t have a great way to preview the final video until we published it on YouTube. We used Premiere Pro to edit the footage together, but we were not able to see the stitching problem until a few days after the video was published on YouTube. By that point it had already taken off and it was too late to change out the vid. Live and learn…
Were we paid by the government to create this video?
No.
Are we a part of the Illuminati?
Still waiting on that membership card... No.
Why are all the people standing still?
We took a still image plate where Zapruder shot his film, so having extra movement would be distracting from the film and reduce the quality of our final video. Plus, there were technical limitations with the camera we used.
Why do some of the people have cell phones?
Because the 360 plate is a combination of an image from 2016 and 1963. Or maybe this is the Charlie Chaplin conspiracy all over again...
How can we see in 360?
YouTube allows users to upload 360-degree footage and move around the screen. It’s actually really easy to do.
What camera did we use?
A Ricoh Theta S.
How did they have a 360 camera in 1963?
They didn’t. The video is an illusion using modern compositing techniques.
Who made this?
Caleb & Shelby Ward (It’s in the credits)
Where’s the Babushka lady?
She’s the woman in the red dress.
Why is it blurry?
4K video is kinda blurry in a 360 format. Maybe when YouTube supports 16K the blurriness will go away?...
How Long Did this Project Take to Create?
About 50 Hours
What Software Did You Use?
Adobe After Effects, Photoshop, and Premiere Pro.
How can I support future 360/Creative Projects?
We do all of our 360 creative work for free because we believe this is an important educational tool for society. In fact, it's probably the closest thing we have to actual time travel.
We have many more 360 projects in development at the moment. So if you’d like to support our efforts please feel free to donate using the button below. We'll even credit you in the next vid!
Thanks for joining us on this educational journey. Putting this project together was a blast. If you have any suggestions for future 360 or educational projects please feel free to reach out.
Cheers!
Caleb